Easy Last-Minute Halloween Decorations for Your Home
Oct 20, 2015 • Maria Nicola Vicente

Oct 20, 2015 • Maria Nicola Vicente
Halloween is a great holiday for children and adults alike, and why wouldn’t it be? We get to dress up in costume, scare ourselves silly, and have as much candy as we can without passing out from the sugar rush.
Don’t be one of those people who string up their parols and Christmas lights before All Hallow’s Eve. Check out these easy, DIY decorations that you, your friends, and your kids can all have fun making–let’s give Halloween the celebration it deserves! After all, you don’t wanna disappoint those trick-or-treaters when they come knocking!
For this decoration, simply cut eyes out of the roll of cardboard, slip a glowstick in and seal both ends with black craft paper. Leave these in the bushes outside your house, or anywhere visitors will least expect them!
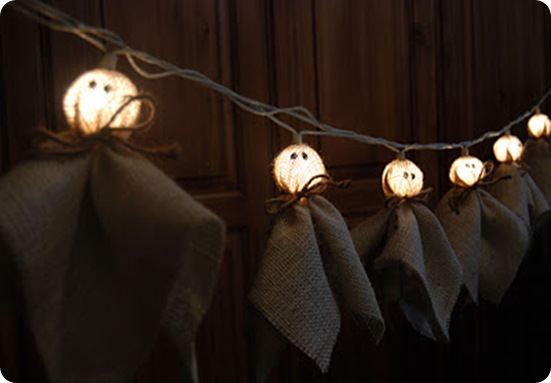
Simply string the Christmas lights up as you would for the holidays, except wrap a square of burlap (or gauze) around the bulb and tie it off with a length of twine. Draw some eyes with a black marker, and tada! You have a garland of ghouls to greet visitors with!
Find a peg that will suit your door (for example, Frankenstein if your door is green, a goblin if your door is red), cut the shapes out using that image as a guide, and attach to your door with masking tape to avoid ruining the paint.
Print out the letters you need from this downloadable link (or find a different font you like!), cut out the middle bit, tape it over the door mat, and simply fill in the space using some black paint. Voila, you have a Halloween-friendly way to greet visitors!
Measure around some old jars you have lying around the house, cut and tape the crepe paper to fit around it (or dilute the paint in some water and give the jar a quick, thin coat of your desired color!), and draw on some jack-o-lantern faces. Position these outside your house or on a table, fit in a tealight candle, and you have yourself some very cheap (and very reusable) “pumpkins” for decor!
This one is sure to be a kick for the kids, just make sure you prepare for a mess! Cover your palm and fingers with glue, dip it in red paint, and wait a minute or so for it to dry. Once dry, peel it off and apply it onto a length of saran wrap that you’ve cut ahead of time. Attach the saran wrap to windows, or hang it in doorways to give guests a creepy surprise when they walk in!
What You’ll Need: Black cartolina, scissors, tape, (optional) orange crepe paper
Amp up the spook at your house by leaving a few monsters and ghosts at your windows. Simply draw out their basic shapes then cut out the silhouettes and tape them to the windows for an eerie vibe! Not into drawing? No problem! Check out some great printable stencils here. Hang up some orange paper behind your stencil to give it that glow–this looks especially great at night!
Measure the length of your windows and add a little buffer. Cut out thick strips of cardboard from your old boxes, and draw on some wood grain on the blank side. “Nail” these boards in crisscrossing, haphazard array outside your windows with some tape, dotting the corners with the silver marker to create fake nails.
Take your own arm, arrange it bent at the elbow as if you’re reaching out for something, and trace it out on a sheet of blank cartolina. Create and cut out as many as you need, and arrange these cut outs as if they’re coming in through the spaces between your “boarded up” windows!
If there isn’t a prize for best haunted house, there should be–you’d bag that award for sure! Happy Halloween!
Got any other decorating tips for us this Halloween? Share them with us in the Comments Section!
Input your search keywords and press Enter.
